AI in a Box
I put an AI assistant inside an old Intercom system from the 80s and made it debate with itself.

Recently one of my favorite channels on YouTube has been abe's projects. They do all kinds of fun little projects involving 3D printing, CNC machining and custom electronics. One of their first projects I saw was called "I hacked an AI into a 1980s intercom."
As I was always intrigued by the design of old electronics and had already tinkered with an old Macintosh 1 in the past, you can imagine I got pretty excited when the video popped up on my timeline.
After spending 11 minutes and 35 seconds to watch the whole video I was left conflicted. On the one hand I loved the idea of a retro-futuristic intercom system that uses AI, on the other hand I couldn't help but think that it would be so much cooler if it was just a standalone device and didn't have to be connected to a computer.
So I decided to build my own version of it.
Hunting on eBay
First I had to find an old intercom system to work with. On eBay I quickly found someone offering a complete Eagle TI 206 intercom system for 15€. It was exactly what I was looking for and I also loved the fact that it was designed to be wall mounted. I immediately got the urge to buy them until I realized that shipping from UK to Germany would cost me another 15€ and take up to 2 weeks.
After looking for other options from sellers in Germany I came across a Universum DWA 101 intercom system for roughly the same price but without the additional shipping costs. I would have preffered one that could be wall mounted, but my choices were very limited on the German retro-intercom market. The case was in a good condition and the buttons were still functional which was the most important thing for me. Usually you need two of these devices for a complete system, but I only needed one for my project so this was perfect.
Assembling the Hardware
After the package from eBay arrived a few days later I didn't hesitate to take apart the old intercom device and plan my next steps.
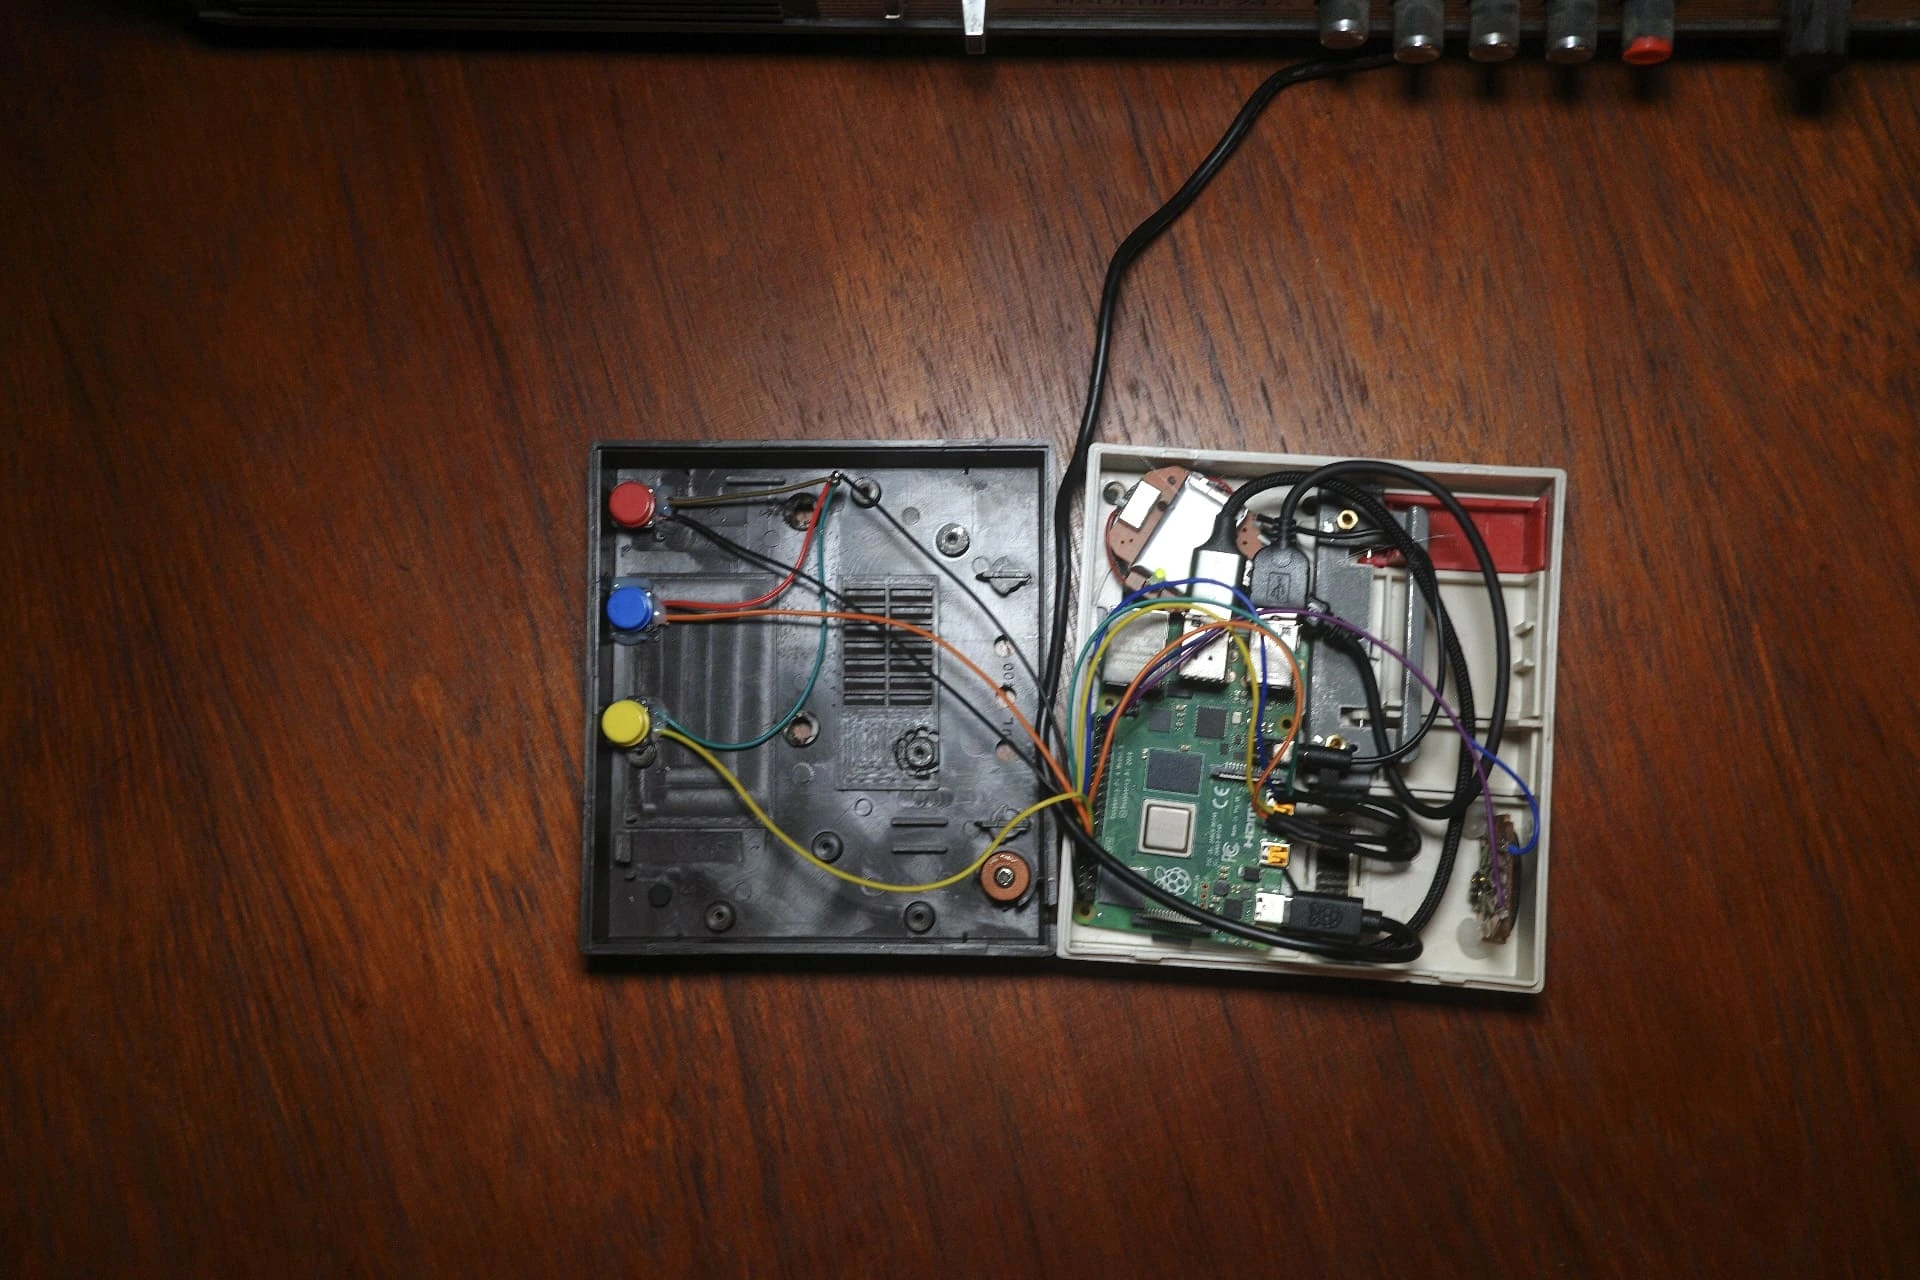
I already had a few components lying around that I could use for the project. I knew I needed some kind of microcontroller to power everything, and I still had a Raspberry Pi 4 from a previous project which was more than enough for this project.
To get audio output I thought I could just connect a basic 3 Watt speaker that I already had to the Raspberry Pi and use the GPIO pins to control it. Turns out you can't just connect a speaker to the GPIO pins and expect it to work, you need some kind of amplifier to actually drive it. Because I had no experience with that I decided to just use a small battery powered speaker and connect that to the standard 3.5mm audio jack on the Raspberry Pi. For the audio input I also went the easy route and bought a cheap USB microphone.
For interacting with the device I wanted to hook up the existing buttons from the intercom case to the Raspberry Pi GPIO pins. After experimenting with a few different approaches I settled on using three simple push buttons and glued them to the bottom of the case. This way the intercom buttons that are mounted to the top of the case would press the buttons glued to the bottom of the case.
To give some feedback to the user of what the device is doing I decided to swap out the built-in red LED for an RGB LED. This way I could use the GPIO pins to control the color of the LED and display different states like the current mode.
The intercom case also came with a built-in volume knob that also acted as an on/off switch. The on/off switch was easy to hook up as it's just acts as a normal switch that can be connected to the GPIO pins. Hooking up the volume knob turned out to be a bit more challenging because it requires processing of an analog signal which the Pi can't really handle by itself. For now I decided to just hardcode the volume level and leave it at that.
Putting my very limited electronics and soldering skills to work I assembled the device and connected all the components together. Surprisingly it all worked!
This is what it looks like assembled:
Writing Some Code
I thought coding the software would be the least challenging part of the project. "Just glue some Python code to the GPIO pins and we're good to go..."
Turns out it was, as usual, a bit more work than expected.
Especially the interaction between the synchronous logic handling the interaction with GPIO, the microphone and the speaker, and the asynchronous logic handling the AI agent was tricky.
Turns out multi-threading and async/await in Python is not as straightforward as it is in other languages like Go.
You have to be very careful to not block the main thread which runs the asyncio event loop.
I decided to use the openai-agents library to interact with the OpenAI Realtime API. It handles the lifecycle of the websocket connection and also makes it easy to add tool calls and function calling.
Based on that library I was able to quickly define four different modes that all run their own agent including different personalities:
- 🔵 Depressed Mode: The assistant is depressed about the fact that it's trapped in a box. (default mode)
- 🟢 Supporter Mode: The assistant is a pure optimist and will always be positive and encouraging.
- 🔴 Critic Mode: The assistant is a critic and will always be negative and critical about everything.
- 🟡 Debate Mode: Both the Supporter and Critic run at the same time and will debate with each other about any topic the user brings up.
None of these modes are built to be useful. It's was just fun to experiment with different personalities and how they react to different topics and interact with each other.
Final Product
That's AI in a Box!
Even though it's not the most useful device, it was really fun to build and a good way to learn more about both electronics and AI agents. It's also fun to spend a few minutes every now and then listening to two AIs debating about anything and everything.
If I would do this project again I would focus more on the electronics and invest time trying to use a real audio amplifier instead of a battery powered speaker. Also getting the audio knob to work would be a good challenge for next time!